Given all of the functionality provided by the parent classes of the Window type, it is possible to represent a window in your application by either directly creating a Window object or using this class as the parent to a strongly typed descendent. Let’s examine both approaches in the following code example. Although most WPF applications will make use of XAML, doing so is entirely optional. Anything that can be expressed in XAML can be expressed in code and (for the most part) vice versa. If you wish, it is possible to build a complete WPF project using the underlying object model and procedural code.
To illustrate, let’s create a minimal but complete application without the use of XAML using the Application and Window classes directly. Begin by creating a new Console Application named WpfAppAllCode (don't worry, you will use the Visual Studio WPF project template later in this chapter). Next, access the Project | Add Reference dialog box and add a reference to WindowsBase.dll, PresentationCore.dll, System.Xaml.dll and PresentationFramework.dll.
Now, update your initial C# file with the following code, which creates a window of modest functionality:
// A simple WPF application, written without XAML.
using System;
using System.Windows;
using System.Windows.Controls;

namespace WpfAppAllCode
{
    // In this first example, you are defining a single class type to
    // represent the application itself and the main window.
    class Program : Application
    {
        [STAThread]
        static void Main(string[] args)
        {
            // Handle the Startup and Exit events, and then run the application.
            Program app = new Program();
            app.Startup += AppStartUp;
            app.Exit += AppExit;
            app.Run(); // Fires the Startup event.
        }

        static void AppExit(object sender, ExitEventArgs e)
        {
            MessageBox.Show("App has exited");
        }

        static void AppStartUp(object sender, StartupEventArgs e)
        {
            // Create a Window object and set some basic properties.
            Window mainWindow = new Window();
            mainWindow.Title = "My First WPF App!";
            mainWindow.Height = 200;
            mainWindow.Width = 300;
            mainWindow.WindowStartupLocation = WindowStartupLocation.CenterScreen;
            mainWindow.Show();
        }
    }
}
Note The Main() method of a WPF application must be attributed with the [STAThread] attribute, which ensures any legacy COM objects used by your application are thread-safe. If you do not annotate Main() in this way, you will encounter a runtime exception.
Note that the Program class extends the System.Windows.Application class. Within the Main() method, you create an instance of the application object and handle the Startup and Exit events using method group conversion syntax. Recall from Chapter 11 that this shorthand notation removes the need to manually specify the underlying delegates used by a particular event.
Of course, if you wish, you can specify the underlying delegates directly by name. In the following modified Main() method, notice that the Startup event works in conjunction with the StartupEventHandler delegate, which can only point to methods taking an Object as the first parameter and a StartupEventArgs as the second. The Exit event, on the other hand, works with the ExitEventHandler delegate, which demands that the method pointed to take an ExitEventArgs type as the second parameter:
[STAThread]
static void Main(string[] args)
{
    // This time, specify the underlying delegates.
    MyWPFApp app = new MyWPFApp();
    app.Startup += new StartupEventHandler(AppStartUp);
    app.Exit += new ExitEventHandler(AppExit);
    app.Run(); // Fires the Startup event.
}
In any case, the AppStartUp() method has been configured to create a Window object, establish some very basic property settings, and call Show() to display the window on the screen in a modeless fashion (the ShowDialog() method can be used to launch a modal dialog). The AppExit() method simply makes use of the WPF MessageBox class to display a diagnostic message when the application is being terminated.
Once you compile and run the project, you will find a very simple main window that can be minimized, maximized, and closed. To spice things up a bit, you need to add some user interface elements. Before you do, however, you should refactor your code base to account for a strongly typed and well-encapsulated Window-derived class.
Currently, the Application-derived class directly creates an instance of the Window type upon application startup. Ideally, you would create a class deriving from Window in order to encapsulate its appearance and functionality. Assume that you have created the following class definition within your current WpfAppAllCode namespace (if you place this class in a new C# file, be sure to import the System.Windows namespace):
class MainWindow : Window
{
    public MainWindow(string windowTitle, int height, int width)
    {
        this.Title = windowTitle;
        this.WindowStartupLocation = WindowStartupLocation.CenterScreen;
        this.Height = height;
        this.Width = width;
    }
}
You can now update your Startup event handler to simply directly create an instance of MainWindow:
static void AppStartUp(object sender, StartupEventArgs e)
{
    // Create a MainWindow object.
    MainWindow wnd = new MainWindow("My better WPF App!", 200, 300);
    wnd.Show();
}
Once the program is recompiled and executed, the output is identical. The obvious benefit is that you now have a strongly typed window class to build upon.
Note When you create a Window (or Window-derived) object, it will automatically be added to the windows collection of the Application class (via some constructor logic found in the Window class itself). You can use the Application.Windows property to iterate over the list of Window objects currently in memory.
Adding a UI element to a Window in C# code will involve the following basic steps:
Recall that the WPF control content model demands that the Content property is set only once. Of course, a Window that only contained a single UI control would be quite useless. Therefore, in almost every case, the "single piece of content" that is assigned to the Content property is, in reality, a layout manager, such as DockPanel, Grid, Canvas, or StackPanel. Within the layout manager, you can have any combination of internal controls, including other nested layout managers. (Read more on this aspect of WPF development in Chapter 28.)
For now, you will add a single Button control to your Window derived class. When you click the button, you will close the current window, which will indirectly terminate the application, as you have no other windows in memory. Ponder the following update to the MainWindow class (be sure you have imported System.Windows.Controls to gain access to the Button class):
class MainWindow : Window
{
    // Our UI element.
    private Button btnExitApp = new Button();

    public MainWindow(string windowTitle, int height, int width)
    {
        // Configure button and set the child control.
        btnExitApp.Click += new RoutedEventHandler(btnExitApp_Clicked);
        btnExitApp.Content = "Exit Application";
        btnExitApp.Height = 25;
        btnExitApp.Width = 100;

        // Set the content of this window to a single button.
        this.Content = btnExitApp;

        // Configure the window.
        this.Title = windowTitle;
        this.WindowStartupLocation = WindowStartupLocation.CenterScreen;
        this.Height = height;
        this.Width = width;
        this.Show();
    }

    private void btnExitApp_Clicked(object sender, RoutedEventArgs e)
    {
        // Close the window.
        this.Close();
    }
}
Notice that the Click event of the WPF Button works in conjunction with a delegate named RoutedEventHandler, which begs the question, what is a routed event? You’ll examine the details of the WPF event model in the next chapter; for the time being, simply understand that targets of the RoutedEventHandler delegate must supply an object as the first parameter and a RoutedEventArgs as the second.
In any case, once you recompile and run this application, you will find the customized window shown in Figure 27-6. Notice that your button is automatically placed in the dead center of the window’s client area; this is the default behavior when content is not placed within a WPF panel type.
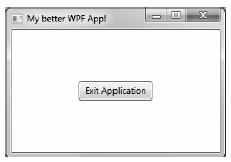
Figure 27-6 A Simple WPF application writen in 100% C# code
Recall that the Application class defines a property named Properties, which allows you to define a collection of name/value pairs via a type indexer. Because this indexer has been defined to operate on type System.Object, you are able to store any sort of item within this collection (including your custom classes), to be retrieved at a later time using a friendly moniker. Using this approach, it is simple to share data across all windows in a WPF application.
To illustrate, you will update the current Startup event handler to check the incoming commandline arguments for a value named /GODMODE (a common cheat code for many PC video games). If you find this token, you will establish a bool value set to true within the properties collection of the same name (otherwise you will set the value to false).
Sounds simple enough, but how are you going to pass the incoming command-line arguments (typically obtained from the Main() method) to your Startup event handler? One approach is to call the static Environment.GetCommandLineArgs() method. However, these same arguments are automatically added to the incoming StartupEventArgs parameter and can be accessed via the Args property. That being said, here is the first update to the current code base:
private static void AppStartUp(object sender, StartupEventArgs e)
{
    // Check the incoming command-line arguments and see if they
    // specified a flag for /GODMODE.

    Application.Current.Properties["GodMode"] = false;
    foreach(string arg in e.Args)
    {
        if (arg.ToLower() == "/godmode")
        {
            Application.Current.Properties["GodMode"] = true;
            break;
        }
    }

    // Create a MainWindow object.
    MainWindow wnd = new MainWindow("My better WPF App!", 200, 300);
}
Application-wide data can be accessed from anywhere within the WPF application. All you are required to do is obtain an access point to the global application object (via Application.Current) and investigate the collection. For example, you could update the Click event handler of the Button as so:
private void btnExitApp_Clicked(object sender, RoutedEventArgs e)
{
    // Did user enable /godmode?
    if((bool)Application.Current.Properties["GodMode"])
        MessageBox.Show("Cheater!");

    this.Close();
}
With this, if the end user launches our program as follows:
WpfAppAllCode.exe /godmode
he or she will see our shameful message box displayed when terminating the application.
Note Recall that you can supply command line arguments within Visual Studio. Simply double click on the Properties icon within Solution Explorer, click the Debug tab from the resulting editor, and enter /godmode within the "Command line arguments" editor.
End users can shut down a window using numerous built-in system-level techniques (e.g., clicking the “X” close button on the window’s frame) or by indirectly calling the Close() method in response to some user interaction element (e.g., File > Exit). In either case, WPF provides two events that you can intercept to determine if the user is truly ready to shut down the window and remove it from memory. The first event to fire is Closing, which works in conjunction with the CancelEventHandler delegate.
This delegate expects target methods to take System.ComponentModel.CancelEventArgs as the second parameter. CancelEventArgs provides the Cancel property, which when set to true will prevent the window from actually closing (this is handy when you have asked the user if he really wants to close the window or if perhaps he would like to save his work first).
If the user did indeed wish to close the window, CancelEventArgs.Cancel can be set to false. This will then cause the Closed event to fire (which works with the System.EventHandler delegate), making it the point at which the window is about to be closed for good.
Update the MainWindow class to handle these two events by adding these code statements to the current constructor:
public MainWindow(string windowTitle, int height, int width)
{
...
    this.Closing += MainWindow_Closing;
    this.Closed += MainWindow_Closed;
}
Now, implement the corresponding event handlers as so:
<private void MainWindow_Closing(object sender, System.ComponentModel.CancelEventArgs e) { // See if the user really wants to shut down this window. string msg = "Do you want to close without saving?"; MessageBoxResult result = MessageBox.Show(msg, "My App", MessageBoxButton.YesNo, MessageBoxImage.Warning); if (result == MessageBoxResult.No) { // If user doesn't want to close, cancel closure. e.Cancel = true; } } private void MainWindow_Closed(object sender, EventArgs e) { MessageBox.Show("See ya!"); }
Now, run your program and attempt to close the window, either by clicking the "X" icon on the upper right of the window or by clicking the button control. You should see the following confirmation dialog (Figure 27-7).
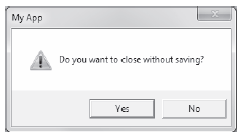
Figure 27-7 Trapping the Closing event of a Window
If you click the Yes button, the application will terminate; however, clicking the No button will keep the window in memory.
The WPF API provides a number of events you can capture in order to interact with the mouse. Specifically, the UIElement base class defines a number of mouse-centric events such as MouseMove, MouseUp, MouseDown, MouseEnter, MouseLeave, and so forth.
Consider, for example, the act of handling the MouseMove event. This event works in conjunction with the System.Windows.Input.MouseEventHandler delegate, which expects its target to take a System.Windows.Input.MouseEventArgs type as the second parameter. Using MouseEventArgs (like a Windows Forms application), you are able to extract out the (x, y) position of the mouse and other relevant details. Consider the following partial definition:
public class MouseEventArgs : InputEventArgs
{
...
    public Point GetPosition(IInputElement relativeTo);
    public MouseButtonState LeftButton { get; }
    public MouseButtonState MiddleButton { get; }
    public MouseDevice MouseDevice { get; }
    public MouseButtonState RightButton { get; }
    public StylusDevice StylusDevice { get; }
    public MouseButtonState XButton1 { get; }
    public MouseButtonState XButton2 { get; }
}
Note The XButton1 and XButton2 properties allow you to interact with "extended mouse buttons" (such as the "next" and "previous" buttons found on some mouse controls). These are often used to interact with a browser's history list to navigate between visited pages.
The GetPosition() method allows you to get the (x, y) value relative to a UI element on the window. If you are interested in capturing the position relative to the activated window, simply pass in this. Handle the MouseMove event in the constructor of your MainWindow class like so:
public MainWindow(string windowTitle, int height, int width)
{
...
    this.MouseMove += MainWindow_MouseMove;
}
Here is an event handler for MouseMove that will display the location of the mouse in the window’s title area (notice you are translating the returned Point type into a text value via ToString()):
private void MainWindow_MouseMove(object sender,
System.Windows.Input.MouseEventArgs e)
{
    // Set the title of the window to the current X,Y of the mouse.
    this.Title = e.GetPosition(this).ToString();
}
Processing keyboard input is also very straightforward. UIElement defines a number of events that you can capture to intercept keypresses from the keyboard on the active element (e.g., KeyUp, KeyDown). The KeyUp and KeyDown events both work with the System.Windows.Input.KeyEventHandler delegate, which expects the target’s second event handler to be of type KeyEventArgs, which defines several public properties of interest:
public class KeyEventArgs : KeyboardEventArgs
{
...
    public bool IsDown { get; }
    public bool IsRepeat { get; }
    public bool IsToggled { get; }
    public bool IsUp { get; }
    public Key Key { get; }
    public KeyStates KeyStates { get; }
    public Key SystemKey { get; }
}
To illustrate handling the KeyDown event in the constructor of MainWindow (just like you did for the previous events) and implement the following event handler that changes the content of the button with the currently pressed key, use this code:
private void MainWindow_KeyDown(object sender, System.Windows.Input.KeyEventArgs e)
{
    // Display key press on the button.
    btnExitApp.Content = e.Key.ToString();
}
As a finishing touch, double click on the Properties icon of the Solution Explorer, and under the Application tab, set the Output Type setting to Windows Application. This will prevent the console window from launching in the background of your WPF application. Figure 27-8 shows the final product of your first WPF program.
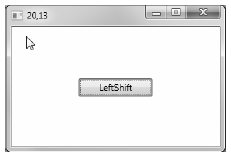
Figure 27-8 Your first WPF program, 100% XAML free
At this point in the chapter, WPF might look like nothing more than yet another GUI framework that is providing (more or less) the same services as Windows Forms, MFC or VB6. If this were in fact the case, you might question the need for yet another UI toolkit. To truly see what makes WPF so unique requires an understanding of the XML-based grammar, XAML.